Thursday, May 28, 2009

Unbelievably Good Cake Doughnuts - Gluten Free


Just look at these babies! You're probably thinking "Oh sure they look good, but how do they taste?" I am here to tell you they taste UNBELIEVABLE! You're talking to a true doughnut lover here. Maybe it's genetic because I grew up with a doughnut-crazy Mom. We could put away a dozen like nobodies business. As a result, I take my doughnuts seriously, and these are seriously the best Gluten free cake doughnuts I have ever had. I got the recipe from the Pamela's Products web-site and made some revisions to suit our personal taste. I don't know what I would do without my Pamela's Baking and Pancake Mix, which is the primary player in this recipe. When I wake up on Saturday mornings (after sleeping in of course), I often have a hankering for these delectable beauties. It thrills my entire family when these doughnuts come to the table still slightly warm. It puts a smile on my face when I hear their "oohs" and "ahhs" and watch them munch happily away with their little frosting covered mouths. You never need to pay nearly $10.00 for store-bought frozen Gluten Free cake doughnuts that are dense, dry and strange tasting ever again. This recipe is so easy.... anyone can do it! All you need for success is a deep Fryer (even just a small one like I have). They are relatively inexpensive and you will find many uses for it. You can customize your frosting flavors and toppings to suit your personal tastes. The sky is the limit... have fun!

Unbelievably Good Cake Doughnuts

4 1/2 cups Pamela's Baking and Pancake Mix , plus some for handling dough

1/4 cup melted butter

2/3 cup milk or buttermilk ( I used buttermilk; if you do not have buttermilk add 1 tablespoon
vinegar or lemon juice to regular milk).

2 eggs

1 cup white or brown sugar (I used white)

2 teaspoons vanilla

Preheat oil in deep fryer to 365-375 degrees. Mix all ingredients together. Dust counter with additional Pamela's Baking and Pancake Mix. Scoop out about 1/3 cup dough at a time. Coat top and bottom with Pamela's Baking & Pancake Mix. With thumb, pierce center of dough and create doughnut shape. Place on a large plate covered with wax paper. Continue until all dough has been shaped. Using the metal spatula that came with your deep fryer CAREFULLY lower doughnut into oil. Fry for approximately one minute on each side. Drain on paper towel lined plates, changing paper towels occasionally if too much oil has been absorbed into paper. Frost and add toppings if desired (glaze recipes below). Serve immediately, or store in a loosely covered container (like a cake keeper). Best if eaten the the same day they are prepared. Yield: approximately 13 doughnuts.


Glaze and Topping Ingredients:

4 cups powdered sugar, divided

Milk

Pure vanilla extract

Chocolate Syrup

Coconut, chopped peanuts and sprinkles if desired as toppings

If you want half of your donuts to be frosted with chocolate glaze and half with vanilla then you will do this:

For vanilla glaze mix 2 cups powdered sugar with 1 tsp vanilla and 2 tablespoons of milk (mixture will be very thick). To thin glaze add additional milk 1 tablespoon at a time, stirring until desired spreading consistency is achieved and glaze is lump free.

For chocolate glaze mix 2 cups powdered sugar with 2 tablespoons chocolate syrup, 1 teaspoon vanilla extract, and 1 tablespoon milk (mixture will be very thick). To thin glaze add additional milk 1 tablespoon at a time, stirring until desired spreading consistency is achieved and glaze is lump free.
If you prefer only one flavor of glaze, then double the recipe for that flavor.

Sprinkle your desired toppings onto separate dessert sized plates (chopped peanuts, coconut, sprinkles, etc). Frost one doughnut and turn it upside down, pressing the frosted side into the toppings on the plate. Press the sides of the doughnut into glaze to ensure toppings are everywhere that there is glaze. Repeat with remaining doughnuts. Serve.

Enjoy!


**Recipe Revision**

Mark's Awesome Fried Rice recipe used to read: "Move rice to the outside perimeter of skillet"; it now reads: "Move vegetable-egg mixture to the outside perimeter of skillet".

Tuesday, May 26, 2009

Rhubarb Pineapple Crisp - Gluten Free


The weather was so gorgeous last weekend... I spent as much time as I could working in my garden. As I was lowering a blueberry bush into the ground, my neighbor called over to me and asked if I would like some rhubarb that she had just harvested from her garden.  I enthusiastically thanked my neighbor and carried those beautiful huge stalks of pinkish red rhubarb into my kitchen. I knew just what to do... make a classic fruit crisp. I did add a bit of crushed pineapple to the rhubarb to add sweetness since I read that rhubarb is naturally on the sour side, and it turned out to be a match made in heaven. Strawberries are often used in rhubarb recipes for this reason. Of course I promptly delivered half of the warm crisp to my generous rhubarb-sharing neighbor. After tasting it she said I could bring it over anytime. Try it with a dollop of whipped cream or a scoop of vanilla ice cream for a truly comforting dessert that delivers an old-fashioned country flair.

Rhubarb Pineapple Crisp - Gluten Free

4 cups fresh rhubarb, cut into 1/4 inch slices

1 1/4 cup crushed pineapple, drained

1 cup GF flour blend (I used Bette Hagman's Featherlight Flour blend found in this great book )

1 3/4 cups sugar, divided

1 tsp. baking powder

1 egg, beaten

1/4 pound butter, melted

Butter an 8 inch square baking dish. Mix the rhubarb, pineapple and 1/2 cup sugar in a bowl. Put the fruit in the bottom of the prepared baking dish. In a bowl, mix together the flour, 1 1/4 cups sugar and baking powder. Add the beaten egg and mix well with a fork or your fingertips (I prefer my fingertips), until the flour is dampened and in small clumps. Scatter the flour mixture evenly over the fruit. Drizzle the melted butter evenly over the top. Using the back of a spoon distribute the butter over all. Bake in a 375 degree oven for 40-45 minutes or until topping is golden brown and fruit is fork tender. Serve warm with whipped cream or vanilla ice cream if desired. Yield: 6 servings
Enjoy!

Crunchy Tostadas with Pico de Gallo - Gluten Free


I hear "MOM... what's for dinner?" from the second I wake up in the morning. My kids seem shocked when I don't have the answer as I rub my tired eyes and attempt to tame my bedhead. The truth is that sometimes I don't know what's for dinner until minutes before preparing it. One thing I do know is that I will please the whole family if I prepare these satisfying tostadas, so I always keep the ingredients on hand. I lay all of of the toppings out on the counter in a row forming a "tostada bar". The kids seem to get a kick out of assembling their own. You would think they might put on too many toppings, but ironically, it's ME that ends up doing that! ;-) I just can't help it... these are so delicious! To speed things up I usually use a pre-packaged Fajita Seasoning mix, but feel free to season with spices from your pantry instead. I have tried it both ways and it is equally good. If you have extra re-fried beans, try serving them in individual ramekins with melted cheese, sour cream and hot sauce on top as a side dish. Enjoy this family favorite, from my country kitchen to yours.

Crunchy Tostadas with Pico de Gallo - Gluten Free

6 corn tortillas

Vegetable oil for frying

1 can vegetarian re-fried beans (or home made if you have them on hand)

2 tablespoons Taco seasoning (Mc Cormick is GF as of 5/26/09)

1 red bell pepper; sliced into strips

1 green bell pepper; sliced into strips

1 sweet onion; sliced into rings and cut in half

1 packet GF Fajita seasoning mix (Mc Cormick is GF as of 5/26/09)

1/4 cup water

Guacamole (purchased or home made)

Sour Cream

1 cup Cotija Cheese; crumbled

Pico de Gallo; recipe to follow (or purchased)

Heat 1/4 inch of vegetable oil in a small heavy skillet over medium high heat. When oil is hot fry tortillas, one at a time for a short time on each side until golden and crunchy. Drain on a paper towel lined plate. Set aside. Heat 1/4 cup of oil in a large heavy skillet over medium high heat. When oil is hot, add peppers and onion. Saute until almost tender. Add 1/4 cup water and and contents of Fajita Seasoning packet. Stir until seasonings are blended throughout, approx. 2 minutes. Place fajita vegetables in a bowl and cover to keep warm. Set Aside. Stir taco seasoning into re-fried beans. Heat beans. Cover to keep warm. Assemble tortillas: spread a thin layer of beans over tostada. Top with fajita vegetables, guacamole, sour cream and Pico de Gallo. Sprinkle with Cotija Cheese. Delicious! Yield: 6 servings

Enjoy!
Cinde :)

Recipe posted by Cinde: http://www.glutenfreetasteofhome.blogspot.com/


Pico de Gallo - Gluten Free

Pico de Gallo - Gluten Free

2 Roma tomatoes

1/4 of a sweet onion (this is 1/4 of the whole onion, not 1/4 cup)

1-2 pickled jalapeno slices

1 1/2 teaspoons fresh cilantro

1/4 teaspoon sea salt

1/4 teaspoon minced garlic

1 tablespoon lime juice

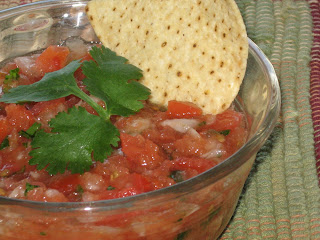
Pulse all ingredients in a food processor in short bursts until desired consistency; serve. This recipe makes enough Pico de Gallo to top 6 tostadas. Double recipe if desired for more servings, or if making as a dip for tortilla chips.

Enjoy!

Thursday, May 21, 2009

Asian Rice Noodle Salad - Gluten Free


This is the perfect time of year to serve this light, refreshing dish. It's clean and simple ingredients allow the flavors of the dish to shine through in a subtle and delicious way. It is filling enough to serve as a main dish, yet would also make a lovely side dish. The home made peanut dressing gives it a unique ethnic flair that is sure to please. If you have left-overs, try giving the salad a make-over by heating it in a skillet with hot oil, cracking eggs into wells in the top of the dish. Cover and reduce heat to low. Heat until eggs are cooked to desired doneness. This salad will also be a welcome addition to any buffet table, potluck or barbecue. Try eating it with chopsticks for fun! Drop me a line in the comments section and let me know how you and your family enjoyed it. :)
Asian Rice Noodle Salad - Gluten Free
1 package (8.8 oz) thin rice noodles (in the Asian section of your supermarket)
1 bag baby spinach
1 large carrot, shredded
1/2 cup pineapple tidbits
1/4 cup minced fresh cilantro
1 green onion, thinly sliced
SESAME PEANUT DRESSING
1/4 cup peanuts
1/4 cup water
1/4 cup lime juice
2 tablespoons Tamari Soy Sauce, Wheat Free
1 tablespoon brown sugar
1 tablespoon vegetable oil
1 teaspoon sesame oil
1/2 teaspoon ground ginger
1/4 teaspoon red pepper flakes
Cook noodles according to package directions (be careful here... the directions say to SOAK the noodles in boiling water after removing them from the heat, do NOT boil the noodles as you would normally; I made this mistake the first time I made these noodles!) Meanwhile, in a large salad bowl, combine the spinach, carrot, pineapple, cilantro and onion.
In a blender, combine the dressing ingredients; cover and process until blended. Drain noodles and RINSE IN COLD WATER; drain well. Add to spinach mixture. Drizzle with dressing and toss to coat. Serve immediately. Yield: 8-10 servings
Enjoy!


Chocolate Cobbler - Gluten Free


Warm. Sweet. Chocolaty. Indulgent. Delicious. Comforting. Impressive. Perfect. Heavenly.

Try it. You'll see. It's my signature dessert, and it can be yours too (I'm not selfish!). This Chocolate Cobbler bakes into a soft warm cake with a slightly crisp top. The cake layer "floats" on a sea of warm, decadent chocolate sauce. Serve the cobbler in a bowl with Vanilla ice cream and pour the warm chocolate sauce on top. This cobbler is my constant craving. I found this recipe in a cooking magazine a few years ago and adapted it to make it Gluten free. Let me know how much you love it! :)

Chocolate Cobbler - Gluten free

1 cup Pamela's Ultimate Baking and Pancake Mix
1/2 cup sugar
2 Tablespoons plus 1/4 cup baking cocoa, divided
1/2 cup milk
3 tablespoons vegetable oil
1 cup packed brown sugar
1-3/4 cups hot water
Vanilla ice cream, optional (but highly recommended!)

In a bowl, combine the Pamela's Ultimate Baking and Pancake Mix, sugar and 2 tablespoons cocoa. Stir in milk and oil until smooth. Pour into a greased 8 inch square baking pan. Combine the brown sugar and remaining cocoa; sprinkle over batter. Pour HOT water over top (DO NOT STIR). Bake at 350 degrees for 40-45 minutes or until top of cake springs back when lightly touched. Serve warm with ice cream if desired. Yield: 6-8 servings

Enjoy!


Chili Garlic Snack Mix - Gluten Free


Hooray! Another easy and delicious Chex snack mix recipe. Can one ever really have enough Chex mix? Not in my house! My whole family loves it. My hubby munches on some whenever he happens to pass by it... it's hard to resist! The kids love to take it to school for a snack, and they also reach for it when watching movies at home. Me? I eat it anytime... I am always up for a tasty snack. This makes such a large amount that we can enjoy a batch for a whole week. Give it a try. It has a wonderful savory flavor with just the right amount of chili powder to give it a mild kick. Trust me though, it isn't too spicy for kids. My kids are very picky eaters and they all enjoy it. :) I added more peanuts than the original recipe on the Chex box called for and I think it is even better now. Let me know how you like it!

Chili and Garlic Snack Mix

8 cups Gluten Free Corn OR Rice Chex Cereal
1 bag (3 oz) butter flavor microwave popcorn, popped
1/2 cup dry-roasted peanuts
3 tablespoons vegetable oil
1/3 cup grated Parmesan cheese
2 teaspoons garlic powder
2 teaspoons chili powder

Heat oven to 300 degrees F. In very large bowl, mix cereal. popcorn and peanuts. Drizzle with oil; toss until evenly coated.

In a small bowl, mix remaining ingredients; sprinkle over cereal mixture. Toss until evenly coated. Spread cereal mixture in ungreased large roasting pan.

Bake uncovered 15 minutes, stirring once. spread on waxed paper to cool, about 10 minutes. Store in airtight container. Yield: 32 servings (1/2 cup each)

Was that easy, or what?

Thursday, May 14, 2009

Gluten Free News Flash!!


Betty Crocker (General Mills) is launching 4 GLUTEN FREE baking mixes in grocery stores by June 1st!!! Hooray!!!! Can it be true? Gluten free cake mix at the regular market for AFFORDABLE prices? Yes it IS true... I called General Mills today, and they confirmed it as fact. The customer service gal that I spoke with must have thought I was crazy because I couldn't contain my glee, as my love for General Mills poured out of me like warm maple syrup on a short stack of GF pancakes. I guess my enthusiasm was contagious, because soon she was giddy too (much to her surprise). We all MUST thank General Mills so they keep the GF products coming! More importantly, we must spread the word to all of the GF people we know, and BUY their GF products. If their new GF products don't sell well, they will be discontinued. We can't let that happen! It is up to us to support their efforts through repeat purchases. Please take a moment to visit their website and send them an e-mail or give them a call (phone # is on contact us page on their web site) at http://www.generalmills.com/ to thank them. They have given us many HUGE GF gifts in the last few months. First GF Chex cereals (4 more new flavors to be released by 6/1, by the way) and now the gift of all gifts Betty Crocker Gluten Free Baking mixes!! I have daydreamed what it would be like to stock up on affordable cake mixes (like in my pre-GF days), so I could once again whip out quick desserts for any occasion. I mourned the loss of that when we had to go GF. Really, I did (with tears and everything). For some reason, cakes (both the making and the eating of them) bring me great pleasure. I just couldn't justify $7.00 for a GF cake mix that (to add insult to injury) only made 1 layer cake for Pete's sake! Get real! I have a few yummy GF cake recipes that I make from scratch, but quite frankly even though my intentions are good, I don't always have to time (or the desire) to spend 3 hours of my day to make a cake. So the bottom line is, we have been eating a lot less cake than we used to pre-Celiac. NO more my friends, no more! I' m back in the saddle again! This crazed cake lover will be cranking out cakes and cupcakes faster than you can say Betty Crocker. :)

The Betty Crocker Gluten Free mix selection will include:

--GF Devils Food Cake Mix
--GF Yellow Cake Mix
--GF Chocolate Chunk Brownie Mix
--GF Chocolate Chip Cookie mix

Happy GF baking!

Wednesday, May 13, 2009

Super Easy Baked Mac n' Cheese - Gluten Free


By now you have probably figured out that I adore comfort food. Always have, always will. No apologies here, although I often feel a strong need to admit this. :) Is it due to my families southern roots? Possibly. Is it the stress of being a Mom with a busy family of 5?? Definitely. So in honor of stressed out-busy families everywhere, may I present you with THE easiest, yummiest Mac 'n Cheese recipe I have ever made? Wanna know the coolest part? The sauce is NATURALLY Gluten free!! Woo hoo! No compromising here! And talk about fast! There is no roux to make, and eliminating that step gives you more time to break up the pointless arguments that your kids are having with each other in the background. ;) My mission in life is to hunt down recipes that can be revised for my gluten free-vegetarian household. I spend many, MANY hours searching. My collection is growing quite large now and I'm lovin' it! If you don't have enough spare time to search, feel free to visit my blog anytime for ideas. I've done the hunting for you. This Recipe came from Redbook magazine. I revised it to be Gluten free. Make this next time your head is spinning in too many directions, or when your kids have back-to-back lessons on a school night. Try it after a long hard day. Preparing this won't suck your last remaining drop of energy, and after tasting it... everyone in your family will thank you (and might even do the dishes to show their gratitude). :)

Super Easy Baked Mac n' Cheese - Gluten Free

Ingredients

2 cans (12 ounces each) evaporated milk
4 cups extra sharp cheddar cheese (Tillamook is GF and vegetarian)
1 pound GF elbow Macaroni; firm-tender cooked (I used Tinkyada
and cooked for 8 minutes)
1/2 cup grated Parmesan Cheese
1/3 cup plain or herb flavored GF bread crumbs (I save the heels and crumbs from GF bread, let it dry out on the counter, then pulse in food processor to make crumbs; store in freezer)

Directions
Preheat oven to 350 degrees F. Mix evaporated milk and grated cheddar cheese in a 5 quart dutch oven. Cook over medium-low heat, stirring frequently, until cheese is melted and sauce is slightly thickened; season with freshly ground black pepper to taste. Stir cooked pasta into cheese sauce.

Pour pasta mixture into a greased 13x9x2 inch baking dish. Mix Parmesan cheese and breadcrumbs; sprinkle over top. Bake 22-25 minutes, until mixture is bubbly and breadcrumbs are slightly browned. Yield: 12 servings


Stuffed Grape Leaves (Dolmades) - Gluten Free


I love ethnic food. I grew up eating it, and to me it is comfort food. My Grandma married the nicest man alive (my Grandpa Raoul) when my Mom was little. He was Hispanic, so my Grandma (who was an amazing cook) learned how to make authentic Mexican food from Grandpa Raoul and his mother, my Great Grandma Annie. My Grandma and Grandpa Raoul even owned a Mexican restaurant in the 1960's. It was called "Raoul's Golden Sombrero". Grandpa ran the kitchen and Grandma waited tables. How CUTE is that??? I can still remember eating my Grandma's handmade flour tortillas hot off her well seasoned cast iron pan. The salty butter melted immediately upon hitting the tortilla, and I rolled it up and ate my delicious prize. Melted butter ran down my hands, and I didn't care. Comfort. What does this have to do with Stuffed Grape Leaves? It is connected because it illustrates one of the examples of how ethnic food became comfort food for me at a young age. I have similar memories of Middle Eastern Food as a child. My Mom re-married when I was 8 years old. My Step Dad was Syrian. He had this huge family that liked to celebrate anything and everything all of the time. I think it might have been an excuse for the women of the family to prepare massive platters of the greatest tasting Middle Eastern comfort foods known to man. In addition to mounds of creamy hummus served with bakery fresh Pita triangles, savory rice dishes and Roasted Lamb, there was always a giant mountain of Stuffed Grape Leaves (aka Dolmades). As a child, I thought they looked like shiny green cigars. I approached with caution. After much convincing by a relentless room full of persuasive adults, I finally tasted one. WOW! Lemon-y and salty, yet balanced with a slight fruitiness. I loved them! I could polish off a pile of them in no time. Those Dolmades of my childhood contained meat and I am now a vegetarian, so I had to search for a suitable recipe. I recently found an excellent recipe for vegetarian Dolmades (courtesy of Tyler Florence). I tweaked the recipe a little bit, based on my experiences while preparing this dish. Dolmades make such a perfect light meal for Spring and Summer when served with a vinegar infused cucumber and tomato salad. Add a side of hummus and some GF crackers or lavosh bread if you like. They are a delicious offering as an appetizer when entertaining too. Served hot or cold,
I am sure you will agree that Dolmades stand for one thing. Comfort.

Stuffed Grape Leaves (Dolmades) - Gluten Free
Ingredients
1/2 cup extra virgin olive oil
1 large yellow onion, finely chopped
1 small fennel bulb, halved cored & diced
1 teaspoon grated lemon zest
1/2 cup pine nuts
1 cup long grain rice
1 1/2 cups vegetable broth (at this writing Swanson's is GF)
2 tablespoons finally chopped fresh dill leaves
1/4 cup finely chopped flat leaf parsley
salt and fresh ground black pepper
8 oz jar grape leaves, rinsed and drained
2 lemons, juiced (save the peels to grate for the zest in this recipe; freeze extra for future use)

Directions
To make the filling, coat a large saute pan with 1/4 cup of the oil and place over medium heat. Add the onion, fennel and lemon zest and stir until soft, about 10 minutes. Add the pine nuts and rice, saute for 2 minutes, stirring to coat. Pour in just 1/2 cup of the vegetable broth and lower the heat. Simmer until the liquid is absorbed and the rice is al dente, about 10 minutes. Scrape the parboiled rice mixture into a bowl and add the dill and parsley; season with salt and pepper to taste. Allow to cool.
To assemble the Dolmades, lay a grape leaf on a work surface, shiny side down. Put 2 Tbsp. of the rice filling near the stem end of the leaf. Fold the stem end over the filling, then fold both sides toward the middle, and roll up into a cigar - it should be snug but not overly tight because the rice will swell once it is fully cooked. Squeeze lightly in the palm of your hand to secure the roll. Repeat with remaining grape leaves and filling.
Place the Dolmades in a 9x13 glass baking dish, seam side down in a single layer. Pour the remaining cup of broth, remaining olive oil, and the lemon juice over the Dolmades, the liquid should reach halfway up the rolls, add some water if necessary. Cover the pan and Bake @ 350 degrees for 40-50 minutes, or until the Dolamdes are tender when pierced with a fork. Serve warm, at room temperature, or cool. Tastes great served with a side of Cucumber Tomato Salad (recipe below).
Cucumber Tomato Salad
1 English cucumber or regular cucumber, sliced (no need to peel English type)
4 ripe Roma tomatoes, sliced (or 2 medium sized tomatoes)
Extra Virgin Olive Oil
Feta Cheese
Balsamic Vinegar
Salt and Fresh Ground Pepper
Arrange sliced tomatoes and cucumbers on a dinner sized plate. Drizzle with Extra Virgin Olive Oil and Balsamic Vinegar. Sprinkle with crumbled Feta cheese. Sprinkle with salt and fresh ground pepper to taste. Yield: 4-6 servings






Monday, May 4, 2009

Moist Banana Cake - Gluten Free


Here's the deal. This Banana cake ROCKS!!! It is easily one of the most delicious cakes I have ever eaten, even before going Gluten free. It is pure comfort food. It doesn't have the dense texture of a traditional banana bread, it has the more smooth, delicate texture of a cake. The frosting is a traditional cream cheese frosting that in my opinion is nirvana in and of itself. My daughters and I can lick the frosting beaters and bowl clean in minutes. I must warn you, this recipe is not for the faint of heart... it has Paula Deen written all over it. Loads of butter and sour cream. Need I say more? This is most likely why it tastes so delectable! I say: you only live once... so "let them eat cake"! Cake like this can even make a satisfying breakfast (why not, it has bananas in it and bananas are brain food, don't ya know!). Kudos to Pamela's Products. I got this recipe off of their website http://www.pamelasproducts.com/. It was one of the winning entries from the 2006 Pamela's Greatest Gluten-free Recipes Contest. It was submitted by Greg R. THANK YOU Greg R!! I will be forever grateful to you for this recipe. I freeze individual slices of this Banana Cake with wonderful results. Place the frosted cake in the freezer for 30 minutes to firm up the frosting. The partially frozen slices can then be sliced and wrapped in plastic wrap. Place the individually wrapped slices in a freezer zip top bag, and place the bag in the freezer. To defrost: remove desired amount of slices; unwrap and thaw on a plate on the counter for 1 hour. The cake will then be perfectly defrosted, moist and ready to eat. Next time you look at your "seen better days" bananas, don't throw them out... make this cake! Post a comment and let me know how much you love after you make it. :)

Cheers,
Cinde

Moist Banana Cake - Gluten free

2 large ripe bananas
1/2 cup sour cream
2 eggs
2 tsp. lemon zest
1 tsp. vanilla
1/2 cup sugar
2 cups Pamela's Ultimate Baking and Pancake Mix10 TBSP. butter, softened

Instructions: Preheat oven to 350 degrees. Prepare a 9 inch cake pan: grease sides and bottom, line bottom with parchment or wax paper and grease again, then dust bottom and sides with white rice flour.

Mash the bananas until smooth. Add the sour cream and use mixer to blend until smooth. Add the eggs, lemon zest and vanilla and blend. Measure Pamela's Baking & Pancake Mix and sugar in a separate bowl and mix together. Add butter and half of the banana mixture and mix slowly until dry ingredients are well moistened. Increase speed to medium and beat for one and a half minutes to aerate batter. Scrape down sides of bowl. Add remaining banana mixture in two parts, beating for 20 seconds after each. Scrape down sides of bowl. Scrape batter into prepared pan. Smooth with spatula and bake in center of oven for approximately 30 minutes or until a toothpick inserted in center comes out clean.

Allow cake to cool in pan for 10 minutes. Remove cake from pan and cool completely on a wire rack.

Yield: 1 nine inch cake (double the recipe for a two layer cake).


Cream Cheese Frosting

1 8 oz. brick cream cheese at room temperature
8 TBSP. Butter (1 stick) at room temperature
3-3/4 cup confectioners sugar, sifted
1 teaspoon pure vanilla extract

Place cream cheese and butter in a large mixing bowl. Blend with an electric mixer on low speed until combined, 30 seconds. Stop the machine. Add the confectioners sugar, a bit at a time, blending with the mixer on low speed until the sugar is well incorporated, 1 minute. Add the vanilla, then increase the mixer speed to medium and blend the frosting until fluffy, 1 minute more.

Use at once to frost the top and sides of your cake.

Yield: Makes 3 cups, enough to frost a 2 or 3 layer cake


Friday, May 1, 2009

Cheesy Fajita Pasta - Gluten Free


What does one do with left over fajitas when there aren't enough left for a full meal? Make Cheesy Fajita Pasta of course! This is a super easy way to jazz up pasta in a jiffy. Any type of fajitas would be great in this dish... I used home made vegetable fajitas (I'm a vegetarian), but you could certainly get great results with fajitas that contain meat or seafood in addition to veggies. Use your home made left overs or restaurant left overs for equally delicious results. This dish truly qualifies as comfort food. The cheese sauce is my Grandma's recipe revised to be Gluten free. It comes out perfect every time. You can top this dish with whatever you have on hand that suits your fancy. I used sour cream, homemade Pico de gallo, and pickled jalapenos. Some other suggestions are olives, avocado slices, and salsa. If you have kids who would find this dish too "daring", try what I did last night. I made the cheese sauce WITHOUT adding the fajitas, and spooned the plain cheese sauce generously over bowls of hot pasta. Voila! A kid friendly (and "picky adult" friendly) Mac n' Cheese. They LOVED it! I then stirred the fajitas into the remaining cheese sauce for my hubby and I. We garnished each bowl to suit our individual taste, and everyone was happy. :) If you have any cheese sauce left over (with or without fajitas added), save it! It makes a quick and satisfying soup for lunch the next day. To make the soup simply stir milk into cold sauce 2 Tbsp. at a time until it reaches a creamy consistency that appeals to you. Microwave for 1 minute on high. Stir. Microwave for one more minute or until hot. Stir again and serve. Another use for the leftover cheese sauce? Heat cheese sauce in the same manner as for soup, but do not add milk. This makes a YUMMY topping for nachos! Gotta love the many uses for Grandma's awesome cheese sauce!

Cheers!
Cinde :)

Cheesy Fajita Pasta - Gluten Free

1 16oz bag Gluten free pasta (I used Tinkyada Penne
but any shape would be fine)
1 stick butter (8 Tbsp.)
7 Tbsp. sweet rice flour
2 tsp. salt
4 cups milk
4 cups shredded cheese (I used sharp cheddar and parmesan shredded by hand, not from a can)
1 tsp ground GF mustard
1 tsp. paprika
black pepper to taste
1 cup (give or take) left-over fajitas (sliced veggies such as sweet red peppers, green bell peppers, onions, sauteed over medium high heat in light olive oil until crisp tender. Add approx. 1/4 cup water and season with spices such as garlic and onion powder, salt and black pepper, oregano, paprika, chili powder, cumin and cayenne pepper to taste. Bring to a boil, then reduce heat to low. Simmer stirring occasionally for 5 minutes or until most of the liquid has cooked down.)
Sour Cream, salsa and pickled jalapenos and/or other toppings as desired for garnish.

Prepare pasta according to package directions (cook only until al dente, which is usually around 12 minutes for Tinkyada). Meanwhile, melt butter in a medium sauce pan over low heat. When it is melted whisk in sweet rice flour and salt. Stir constantly with a wooden spoon for 2 minutes until very bubbly. Gradually whisk in milk. Increase heat to medium high. Stir constantly with a wooden spoon until mixture comes to a boil, and continue stirring for 2 minutes. Decrease heat to low. Whisk in ground mustard, paprika and black pepper. Stir in shredded cheese. Continue stirring over low heat until cheese is completely melted. FOR PICKY KIDS: (and/or picky adults!) use the cheese sauce as it is at this stage over pasta for a traditional Mac n' Cheese. Re-heat left over fajitas in microwave for 2 minutes on 70% power. Stir into cheese sauce. Ladle over bowls of hot pasta. Garnish with sour cream, salsa and pickled jalapenos if desired. Yield: 4-5 servings
 
Button and signature by Blogger Boutique.